Wednesday, August 31, 2011

Back To School Neutral Eye Makeup With Sephora Moonshadow Baked Palette


Who loves the new Sephora Moonshadow Baked Palette - In the Nude? Its been awhile since I've bought any makeup from Sephora, but this one really caught my eye. The colours are amazing, and they are all glittery. It is a baked palette so you can use them wet or dry. The colours go on really sheer when its dry and a little dramatic but still wearable when wet. I've decided to create a neutral back to school look with this new palette.


this makes my hair look yellower than it actually is....


sorry for my crappy attempt @ putting eyelashes.....

I forgot my bbcream this weekend, sorry my skin looks so bad =(


Autumn Clubbing Makeup Tutorial


I can't believe it's almost Fall...and the weather at night is quite cold for August in Canada...especially in Toronto, Ontario. This is my very first time ever wearing orange/yellow eyeshadow, and I decided to make a fun look out of it.
Enjoy =)


with flash

without flash

with flash

without flash


Sunday, August 28, 2011

Nails of the Day: Pretty Floral Purple Nail Tutorial

I have been really bored with my nails lately, and I've been changing my nail style every single day, because I feel that whatever I have on my nails, just isn't good enough...and I'm really tired of just mono coloured nails. So tonight, this is what I've came up with

excuse my disgusting thumb and the my sloppy skills at putting on nail polish


These are the 3 polishes that I've used:


1. H&M nail polish - Lovely Lavender
2. OPI - Happy Aniversary
3. Sally Hansen No Chip 10 Day Nail Color - Clear

Step 1.


Start by taking small pieces of tape and using the straight edge to tape the bottom part of the nails on a slant. Do this for each finger


Step 2. 

taking a lavender polish, colour in the upper part of the nails where there's no tape. This will give you that clean edge tip when the tip is taken off. 

Step 3. 


to make the more elegant,  add this glittery top coat on top of the lavender polish.

Step 4. 


When the nail polish is dry-ish, take the tape off, and stick the floral decorations on top of the painted nails. When the tip of the nails isn't completely dry, it is easier for the stickers to be stuck on them. Make sure the stickers are firmly stuck on the nails, and wait for the polish underneath to dry.

Step 5.


Add a top coat as a final step. And you're done =)


Friday, August 26, 2011

Kose Medicated Seikisho Whitening Mask Review

I bought this whitening mask and it could be seen in my Asian Skincare Haul Video. I finally decided to give it a try today. The label says "whitening", so I assumed that it would be a white creme mask...but to my surprise......


IT'S BLUE! Well, navy blue to be exact....

It is a navy blue gel peeling mask. When you first put this mask on, you can feel a slight tingly feeling.

wow...I look scary...and as you can tell, I didn't spread this evenly enough
And this mask dries really quick, and when it does, you will have difficulty talking, because it hardens, so after that, comes the really really annoying part....


Peeling it off!! It took me around half an hour to 40 minutes to finally get it all off. There were some pretty stubborn pieces, so I just used mineral oil to get the pieces off. Also, it might feel like as if you're peeling wax off of your skin, so it might hurt a little. 


My face feels so fresh and clean afterwards =). There's so much of it in this one bottle, that I think it'll last me at least half a year if I use it twice a week. Overall, I think this is a great mask, just the peeling part gets pretty annoying, and the fact that it hardens so you won't be able to talk or move your mouth until you peel the mask off. 

Monday, August 22, 2011

Nails of the Day: Easy Pink & Blue Crackling Effect Bubblegum Nails


Step 1. 

Rimmel Play Fast - 810 Chill 

Use a blue nail polish to paint your entire nail. Let dry.

Step 2.
Laushine Nail Polish - 10


When the blue coat is dry, add a pink crackling effect nail polish. Let Dry.


Step 3. 
LUCIDarling Fantasic Nails - Pink Topaz


Add a sparkly top coat. Let dry.


Step 4.
Rimmel 60 Seconds Vinyl Shine - 581 Clear


Add a transparent top coat to the tips of the nails. Do not let dry immediately.


Step 5.


Immediately add 3 pink pearl beads on the tips of the nails. Repeat Step 4-5 for the rest of the finger tips


Wednesday, August 17, 2011

Missha The Style Lipsticks Review


I recently received these lipsticks from ebay - seller: rubyruby76 - price: $9.98 USD each
As I've mentioned before, I'm a sucker for pink lipsticks and are always on the hunt for good ones. And these are the latest ones I've came across:
1. Crystal Shine Rouge - PK02
2. Creamy Matte Lip Rouge - PK03


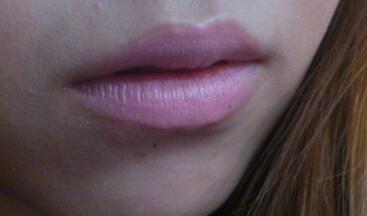
Left: PK02 Right: PK03


1. Crystal Shine Rouge - PK02


This is a sparkly pink lipstick and it smells like strawberries =). The sparkles aren't too heavy, and its just enough to give you a tint. I have already started using this lipstick, and I love it. It's a little sheer, but not too sheer to give colours on your lips. I think its also good enough for everyday wear with any makeup.


2. Creamy Matte Lip Rouge - PK03

Unlike the other one, this lipstick goes on really creamy and gives you sort of a chalky and matte finish. This lipstick smells like watermelons. It gives a "bolder" look than the other one, and it shows up really pink.


Overall, I love these lipsticks! They smell great! And gives awesome colours!

Saturday, August 13, 2011

Back to School Bold Statment Makeup Look Tutorial


circle lenses: geo angel green


The Look with Different Circle Lenses: Geo Hurricane Gray


tokidoki mozzarella cromatico palette